

How To Fix A Washed Out Image In Photoshop
To chief photography, you lot have to master one disquisitional element of nature – light.
Of course, in that location's the usual stuff of shutter speed, aperture, and ISO. But all 3 move around the pin of light or exposure. There may be the expert golden hour for taking the all-time shots, merely in my stance there is no bad time to have a photograph. In fact, a photographer has to make exercise with whatever light is bachelor and construct the best shot out of it. Light afterward all, not only varies during the twenty-four hours, it also varies throughout the year.
If y'all are a photographer and take a good sense of calorie-free (with or without a lite meter), this tutorial is not for y'all. You probably know how to prepare overexposed or underexposed photos. The target audience hither is the wannabe photographer who is just starting to come to grips with shutter speeds, discontinuity, and ISO, and still coming upward brusk with photos that accept just taken in also much sunlight.
So, permit's see how we can set up an overexposed photo with the tool of choice - Photoshop (here, I am using Adobe Photoshop CS5).
Understanding the problem – Overexposure
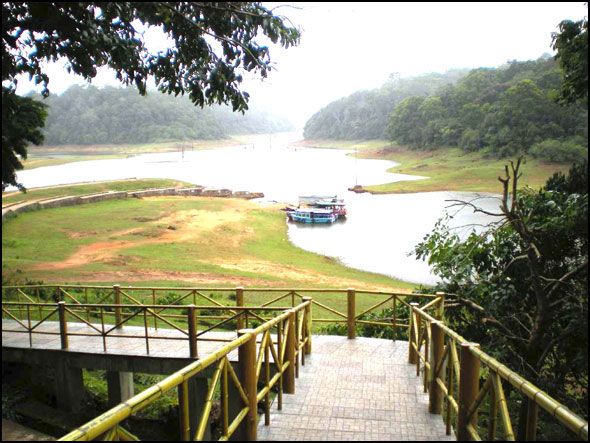
In simple terms, an overexposed photograph ways it is too brilliant. A photo gets overexposed when too much of calorie-free enters through the lens. It happens easily enough when you have a photograph in direct sunlight or the low-cal source is also potent for the subject. Photographers apply the term "washed out" for such photos. It is easy to recognize an overexposed photo as whites will announced too white and colors will exist as well bright and saturated beyond their normal tones. For example, the photo below is too vivid and you can see the loss in detail wherever there are lighter tones.
Many digital cameras have automatic bracketing or auto-bracketing which is besides chosen Automatic Exposure Bracketing (AEB). AEB helps to reduce the overexposure to a sure extent provided your other settings are set right. You should also get into the habit of checking the Histogram at the dorsum of your camera after every shot and correlating it with the scene. If you become the exposure right, the start time around, you will take less to fix later.
Simply merely every bit photography is virtually capturing the unexpected, so too are the results sometimes. In many cases, you have to bring the photograph into a graphics editor like Photoshop to optimize all the variables of a scene and fix overexposed photos.
Taming the problem – Fixing Overexposure in Photoshop
Photoshop gives you quite a few ways to gear up overexposed photos. Y'all can take your choice and try out to run across for yourself which one works all-time with your specific example of overexposure. Here are the like shooting fish in a barrel 3...
The Easiest Way – Cull Shadow/Highlight
If y'all are looking to adjust the exposure apace, Photoshop (all CS versions) gives y'all a couple of sliders that arrive a cinch to adjust the 'lightness' in your photos.
Become to Paradigm > Adjustments > Shadows / Highlights. The feature automatically applies the default settings to your image and you tin can run across information technology if you take Preview enabled in the dialog box. The defaults commonly won't exist right for your photo, and you have to achieve the best results by dragging the Amount sliders under Highlights and likewise under Shadows if demand be.
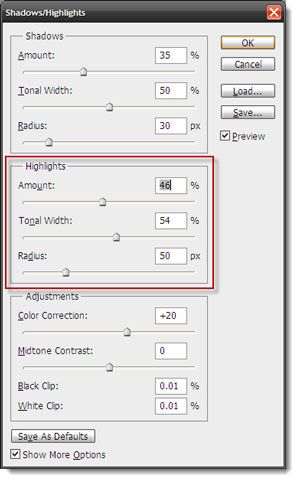
Think - the higher the percentage, the lighter the shadows and the darker the highlights.
2You can conform the Tonal Width also. When the slide is set at a low percent, the nighttime parts of the shadow or just the lightest parts of the highlight are corrected. A college percentage effects a greater range of tones across the image.
Using Shadow /Highlights is quick but subversive as you are working on the paradigm layer itself, and all changes are committed to the epitome once Okayed.
Existence non-destructive – Using the Aligning Layer
With Photoshop CS4 Extended, you got the Exposure Aligning Layer. Adjustment layers (Notation: these are different from the ones nether theParadigm menu) are powerful because they allow y'all to use all sorts of paradigm corrections without permanently changing the pixels in the original prototype or layer.
Open the Exposure Aligning layer past clicking on the icon on the Adjustments Panel. A new layer appears on the top in the Layers Palette.
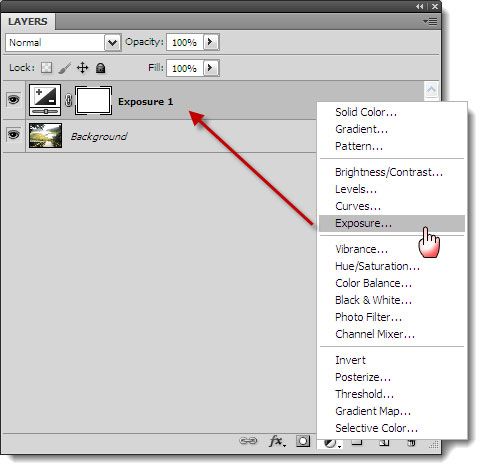
2. It is simple to use: apply the iii sliders - Exposure, First and Gamma - to accommodate the exposure levels.

Exposure adjusts the highlights of the image without changing the dark shadows. First maintains the midtones and Gamma adjusts the dark tones without modifying the highlights.
Experiment with the sliders, and if the outcome is satisfactory save the paradigm every bit a PSD file. With a PSD file, yous tin can adjust the values after, or use the same adjustment layer in some other photo past dragging it to its layer palette.
The Pre-CS Way – Layer, Multiply, Echo
If y'all happen to utilize i of the older pre-CS versions of Photoshop, yous can take the help of layers and blending modes. A blend mode or blend colour is the colour that is applied to the original color of the image to produce an interesting third colour from this blend. There are different types of blend modes bachelor…we volition utilize Multiply which basically multiplies the base color (i.e. the color of the photograph) by the blend color. The result color is always a darker color here.
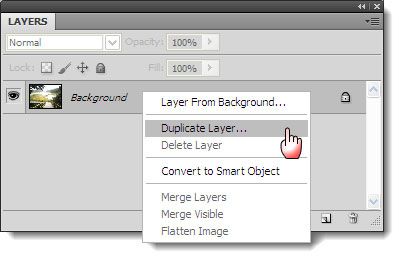
Create a copy of the Background Layer by duplicating the layer ( Correct click > Indistinguishable Layer ).
Alter the Blend Mode of the new layer from Normal to Multiply. This will darken the whole photograph. If it becomes too dark, reduce and adapt the Opacity using the slider.
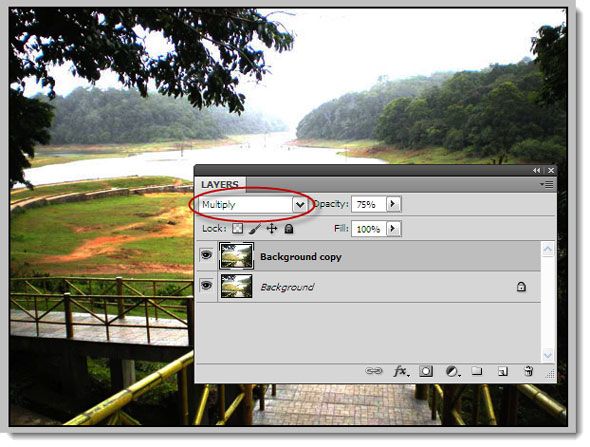
To get the perfect result, you tin can keep duplicating the photo layer and calculation the Alloy mode to the new layer, till you prepare the overexposure.
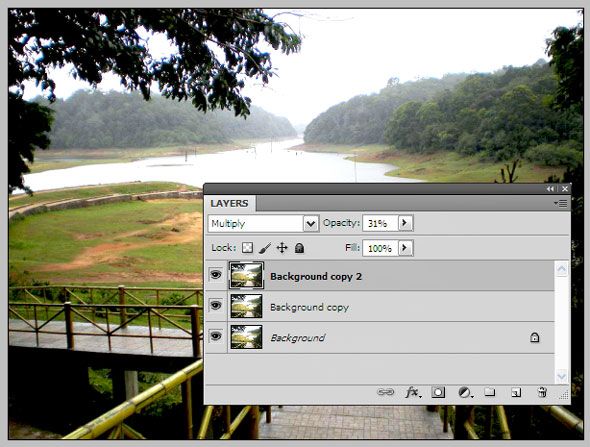
When you lot recall that the photo is stock-still, flatten the image.
Recall – play around with the Opacity slider to go the optimized photo.
Using Camera RAW
Newbies generally don't shoot in RAW but shooting in the RAW format is advocated because it gives yous a lot of flexibility with post-processing. Anyway, post-processing is compulsory when it comes to RAW. Higher-end good quality cameras (these days some compacts too) give y'all multiple format support like RAW, JPEG, and TIFF.
The RAW image format is uncompressed (i.due east. an 18 megapixel camera will produce an 18 MB RAW file), and totally lossless (i.east. the complete data as captured past the sensor). So, yous get all the data to work with and you can choose to snip away in post-processing to create the perfect shot.
Adobe Photoshop has the Adobe Photographic camera Raw feature that handles RAW formats from different cameras and allows you to post-process a photo to ready over-exposed areas.
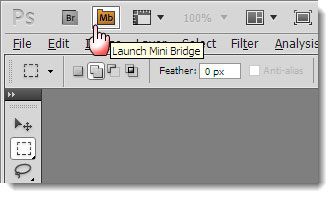
Open up Photoshop and click on the little icon on superlative-left that says Launch Mini Bridge.
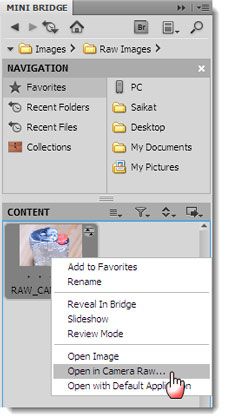
Browse to the paradigm folder using Mini Bridge and right-click on the image and select Open in Camera Raw. You tin as well elevate and drop a RAW file into the window.
The Histogram is our first destination. Click on the Highlight Clipping Warning symbol. Over-exposed areas in your photo are at present indicated in red.
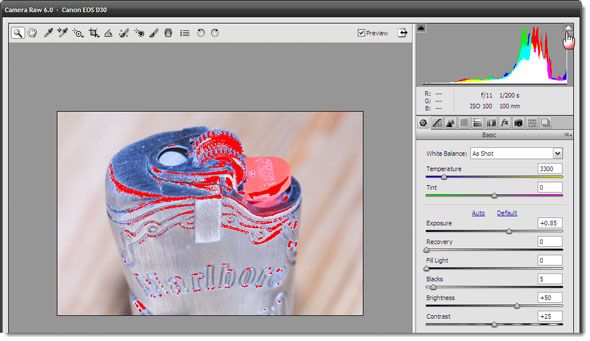
To suit the exposure, we take to use the sliders and carefully calibrate them. Moving the Exposure slider to the left reduces exposure, and the red in the photo gradually starts to reduce. Don't slide the slider besides much to the left because you want to retain your colors too.
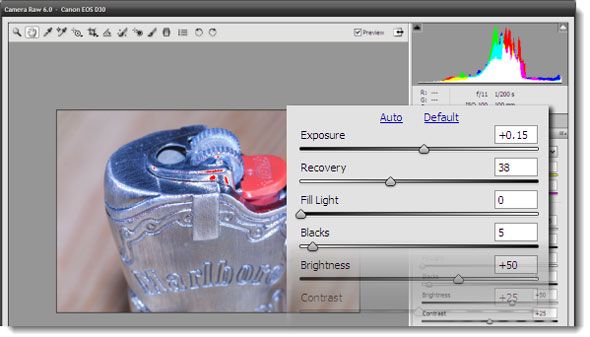
Moving the Recovery slider simply below the Exposure control to the right helps you recover some of the details yous've lost in the diddled-out highlights and farther reduce the red from the image.
Yous can also calibrate the other sliders like Fill up Light which tin can recover some parts from your darker areas without lightening them too much.
You can check and uncheck the Preview to encounter if the before and after changes appear more pleasing now. Salvage the epitome.
Use Your Eyes!
There is no fixed rule here about calibrating the sliders as each photo is unlike and you will have to combine them finer. The best tool for the job is the one you already have – your eyes. Let them be your visual guide as you lot go nearly fixing overexposed photos.
Want to become more than artistic with Photoshop? Endeavour these free Photoshop brushes to touch up your photos.
Tell u.s.a. well-nigh your travails with overexposed photos. Do yous right them or just dump them and click again? Try out the steps here and relieve some of the gems that might be headed for the tin can.
Allow us know how you lot got on in the comments below.
Paradigm Credit: Albina Bugarcheva via Shutterstock.com
Source: https://www.makeuseof.com/tag/fix-overexposed-photos-photoshop/
Posted by: williamslatepred.blogspot.com
0 Response to "How To Fix A Washed Out Image In Photoshop"
Post a Comment